How to Turn Rachio Off for the Winter
I found out recently that my new home's irrigation system was installed in the mid-eighties, and it seems most parts (the pex pipes for laterals, the 1" PVC for the run to the valves for four zones, and the backflow preventer itself) were well-built for that time.
Not much has changed—the fittings and main parts of the system are similar to what you can buy today—and the importance of winterizing the system (getting the water out of all the exterior parts) in colder climates has not been diminished!
I have a small 8 gallon 125-psi Central Pneumatic (inexpensive Harbor Freight brand) air compressor; it's not quite pancake-small, but it's no CFM (cubic feet per minute) champion, either. Rather than paying an irrigation company a bit of money to come out and use their monster compressor to blow out my system, I've MacGuyvered the process to get everything cleared out for the past few years. I want to document what I did here for two reasons: one, so I can remember all the steps in the future and avoid a half hour walking between my basement and the outdoor valves, and two, so others in a similar situation can benefit.
Adding capacity; making connections
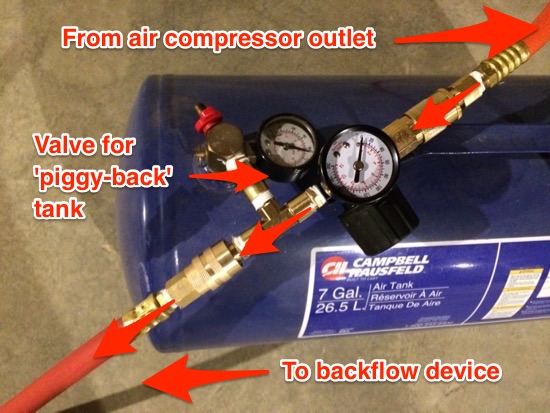
Here's how I set up the compressor and a 'piggy-back' tank in the basement (I run the hose through a basement window to the Febco backflow preventer):
- Run a hose from the air compressor outlet into a tee valve that's connected into the piggy back tank's inlet/outlet.
- Run another hose from the other end of that tee valve out to the Febco valve.
- Make sure the piggy-back tank (in my case a cheap 7 gallon tank) has it's valve completely open, and then regulate the entire system pressure using the regulator on the air compressor.
The reason I use a piggy-back tank is to provide a slight bit more CFM when blowing out the irrigation system. Note that since my compressor itself only puts out half what would be needed to blow out the system continously, I still need to blow out the lines with short 'pulses' of air, 10-20 seconds in length. Then the compressor needs to recharge before I can blow out more water.
Using a piggyback lets me blow out the system for 10-20 seconds at a time instead of 5-7 seconds at a time, effectively halving the amount of time I have to stand by the valve turning it on and off :)
Using the Febco 765-1 to blow out the system
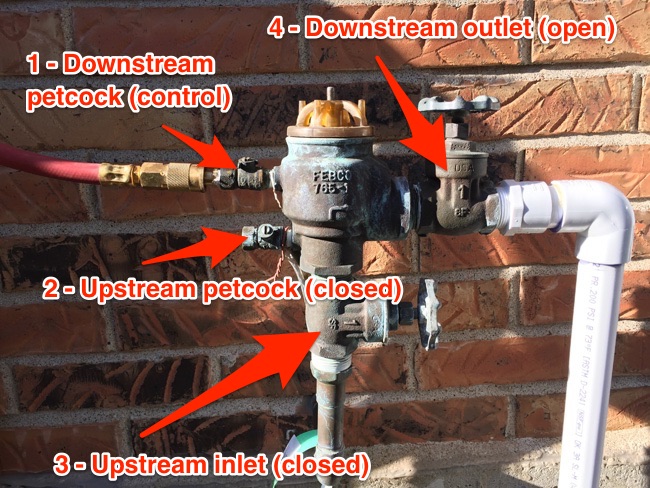
1 - Overview of the Febco 765-1
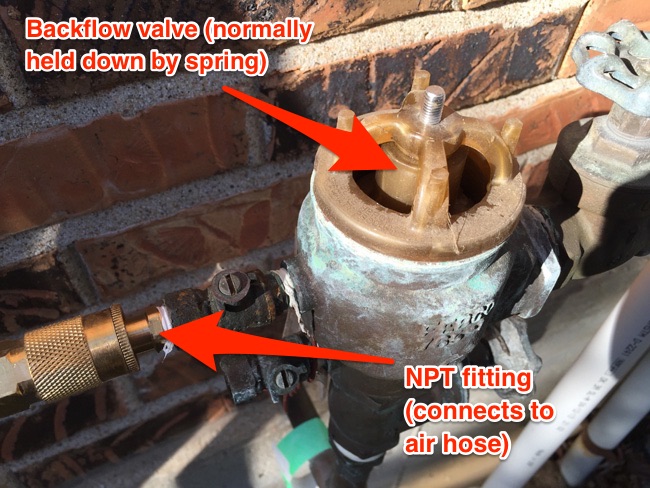
2 - Detail of the petcock and backflow preventer valve
To blow out the system:
- Close the upstream water inlet (below the Febco, #3 in the above picture), close the two small petcock valves on the side (#1 and #2), and open the downstream water outlet (#4).
- Screw air compressor NPT hose fitting to Febco valve, using teflon pipe tape to seal the threads.
- Run a hose from the piggybacked-compressor tanks to this valve.
- Unscrew the little bell cap covering the spring-loaded guts of the Febco (it uses a lock nut, so you'll need a small wrench).
- Turn on the compressor and regulate the pressure to 70-90 psi (don't go higher to prevent damage to your system!).
- Turn on one of your irrigation system zones (and leave it on).
- Using a small screwdriver, pull up the backflow preventer's stopper so it's touching the top of the casing (open).*
- While holding up the stopper, use a flathead screwdriver to open up the top small valve on the Febco and let in air from the compressor.
* Note: if you have a powerful enough air compressor, it may be able to pop up the stopper by itself, but mine is not, so I have to hold up the stopper.
At this point, you'll hear a short 'farting' noise as the Febco seals itself and directs the air to the 1" water outlet. If the farting noise doesn't go away after 2-3 seconds, then your compressor/piggyback setup might not be outputting enough airflow to make this work.
Once the Febco's flatulence is over, you should start seeing water coming out of the sprinklers in the running zone. After 5 or 10 seconds, your compressor will kick on and you'll notice the pressure has dropped substantially. It's a good idea to cut the airflow at this point by closing the top small valve, so you can let your compressor fill the tanks again.
At this point, it's fun game of open-blow-close-wait-repeat. Do this in each zone until you see mostly air/water vapor shooting out of all the heads. It's okay to leave a small bit of water in the system, but try to get out as much as you can before moving on to the next zone.
Finally, make sure to empty out the water in the line from your main water line to the Febco's downstream valve—hopefully there's a faucet somewhere at the bottom of that line so you can just dump it in a bucket.
See more
- The original inspiration for this post was to add my notes and pictures to this post from 2008: How to Winterize Your Sprinklers, Febco Style
- For more automation: Simple DIY Sprinkler Winterizing. Now 100% ARDUINO FREE!
How to Turn Rachio Off for the Winter
Source: https://www.jeffgeerling.com/blog/2015/winterizing-your-irrigation-system-febco-765